Table of Contents
Lumana Integration
Lumana's AI analytics describe what they see in detail: a person's gender, age group, clothing colours and what they are carrying, or a vehicle's type, colour, make and number plate. This integration sends each Lumana alert to TetherX with those details attached, so they sit alongside your other sites, cameras and events.
Lumana sends alerts out through an HTTP Request, which you create once in Lumana and then add to each alert rule that should report to TetherX. Lumana has no setting that sends every alert automatically, so a rule without the TetherX action sends nothing.
There are three parts:
- Create the TetherX HTTP Request in Lumana (once per Lumana organisation)
- Add it to each alert rule
- Optionally, add one rule that reports every person, vehicle and animal Lumana detects
Rules in Lumana or in TetherX
You can either create the rules in Lumana, or, if Lumana passes the metadata, create the rules in TetherX. Either approach works, and you can use both side by side.
Rules in Lumana. Build each alert rule in Lumana as you normally would, such as a missing safety vest in the warehouse or people fighting, and add the TetherX action to it (part 2). Each alert that rule raises arrives in TetherX as a detection on that camera. Use this for anything Lumana decides with its own settings, such as a zone, how long a condition must last, or a watch list of faces or number plates.
Rules in TetherX. Add the one rule in part 3, which passes every person, vehicle and animal Lumana detects to TetherX with its appearance details. TetherX then decides what alerts you:
- The camera's notification settings. Choose Lumana AI, or an object such as Person or Vehicle, to be notified about it while the camera is armed. See Notifications.
- A saved search with Notify me. Save an Appearance search, such as an adult in a red top or a person without a hard hat, and switch on Notify me to be told whenever a new detection fits it, as the Events guide explains.
- A Detection rule. Under the camera's Rules, a Detection rule runs actions when a chosen detection arrives: a push notification or email, an audio challenge, a camera siren or light, or an output. Add Person and Lumana AI with Every condition must be true to act only on people Lumana detects. Rules are currently set up by TetherX support. See Automations and Rules.
With rules in TetherX, you change what alerts you in TetherX without editing anything in Lumana, and the same settings work for detections from your cameras and from TetherX AI.
Before You Start
Ask TetherX support for:
- The receiving address for your TetherX cloud, for example
https://YOUR-TETHERX-DOMAIN/webhooks/lumana - Your integration token, which Lumana sends with every request so TetherX knows it came from your organisation
Warning: Check the address works before you add it to any rule. Lumana switches an HTTP Request off after 5 consecutive failed deliveries, and every rule using it then stops reporting until it is switched back on.
1. Create the TetherX HTTP Request
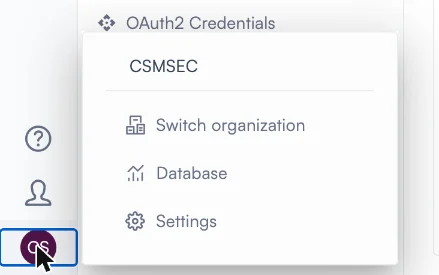
Select your organisation icon in the bottom left corner of Lumana, then Settings
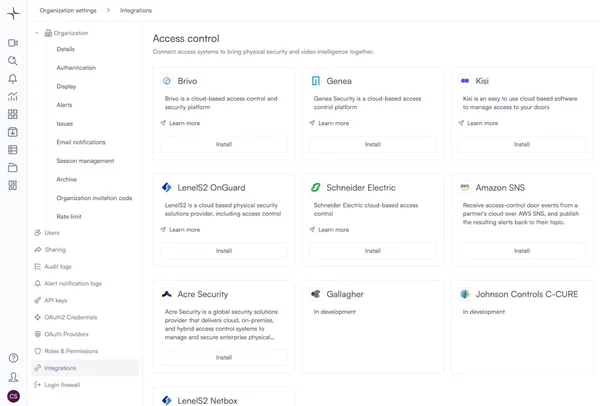
Select Integrations in the settings menu
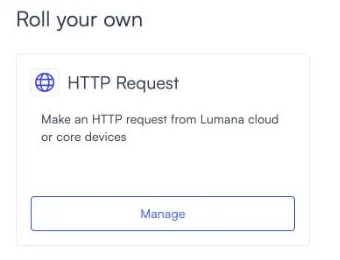
Scroll to Roll your own and select Manage on the HTTP Request card, then Create HTTP request in the top right corner
Fill in the request
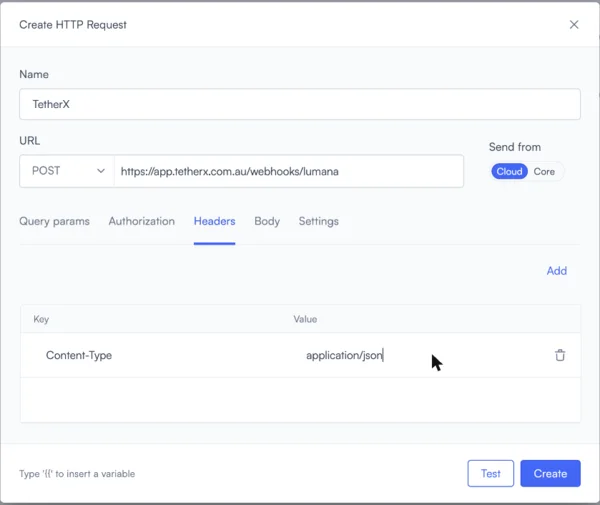
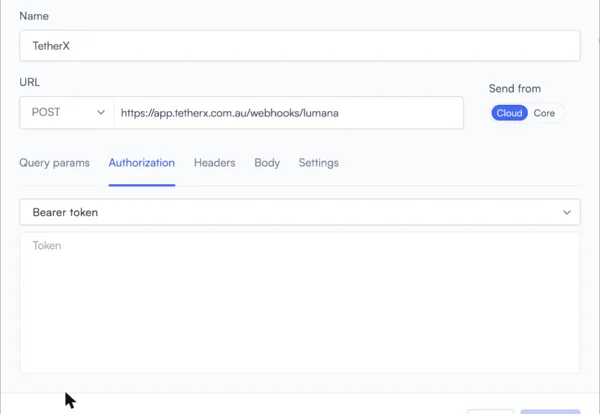
- Name:
TetherX - Method:
POST - URL: the receiving address from TetherX support
- Send from:
Cloud - Headers tab: select Add, then enter
Content-Typewith the valueapplication/json
Open the Authorization tab, choose Bearer token and paste your integration token
Open the Body tab and paste the body below
Select Test. Lumana sends one request straight away. Only continue once it reports success. If it fails, check the URL and the token rather than saving it as it is.
Select Create. Lumana then shows an HMAC key ID and secret for this request. Send both to TetherX support by a secure route, as they let TetherX confirm requests really came from your Lumana organisation.
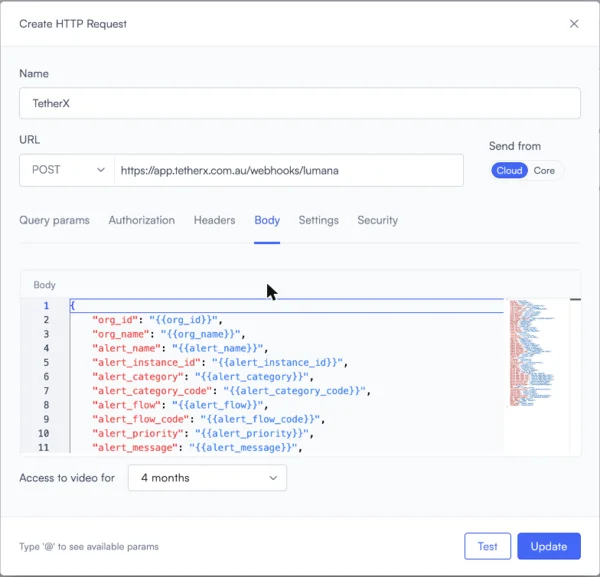
The Body
Each {{name}} is a Lumana variable, which Lumana replaces with the alert's own value when it
sends the request. Type @ in the body editor to see the full list, and pick a variable to
insert it as "{{name}}". Write the braces, not the @: a value typed as "@name" is sent
exactly as written.
{
  "org_id": "{{org_id}}",
  "org_name": "{{org_name}}",
  "alert_name": "{{alert_name}}",
  "alert_instance_id": "{{alert_instance_id}}",
  "alert_category": "{{alert_category}}",
  "alert_category_code": "{{alert_category_code}}",
  "alert_flow": "{{alert_flow}}",
  "alert_flow_code": "{{alert_flow_code}}",
  "alert_priority": "{{alert_priority}}",
  "alert_message": "{{alert_message}}",
  "alert_link": "{{alert_link}}",
  "alert_instance_deeplink": "{{alert_instance_deeplink}}",
  "alert_video": "{{alert_video}}",
  "timestamp": "{{timestamp}}",
  "duration": "{{duration}}",
  "time_unit": "{{time_unit}}",
  "event_id": "{{event_id}}",
  "event_fields": "{{event_fields}}",
  "event_tag_id": "{{event_tag_id}}",
  "event_tag_name": "{{event_tag_name}}",
  "status": "{{status}}",
  "location": "{{location}}",
  "location_id": "{{location_id}}",
  "location_name": "{{location_name}}",
  "edge_id": "{{edge_id}}",
  "edge_name": "{{edge_name}}",
  "camera_id": "{{camera_id}}",
  "camera_name": "{{camera_name}}",
  "camera_address": "{{camera_address}}",
  "camera_coords": "{{camera_coords}}",
  "camera_latitude": "{{camera_latitude}}",
  "camera_longitude": "{{camera_longitude}}",
  "camera_live_view_link": "{{camera_live_view_link}}",
  "camera_metadata": "{{camera_metadata}}",
  "object_type": "{{object_type}}",
  "tracker_id": "{{tracker_id}}",
  "count": "{{count}}",
  "occupancy": "{{occupancy}}",
  "proximity": "{{proximity}}",
  "proximity_status": "{{proximity_status}}",
  "sensitivity": "{{sensitivity}}",
  "thumbnail": "{{thumbnail}}",
  "thumbnails": "{{thumbnails}}",
  "person_name": "{{person_name}}",
  "person_gender": "{{person_gender}}",
  "person_age": "{{person_age}}",
  "person_hair_color": "{{person_hair_color}}",
  "person_upper_body_type": "{{person_upper_body_type}}",
  "person_upper_body_color": "{{person_upper_body_color}}",
  "person_lower_body_type": "{{person_lower_body_type}}",
  "person_lower_body_color": "{{person_lower_body_color}}",
  "person_accessory_type": "{{person_accessory_type}}",
  "person_carrying_type": "{{person_carrying_type}}",
  "person_protective_gear": "{{person_protective_gear}}",
  "gear": "{{gear}}",
  "wear_status": "{{wear_status}}",
  "face_detection_status": "{{face_detection_status}}",
  "vehicle_type": "{{vehicle_type}}",
  "vehicle_make": "{{vehicle_make}}",
  "vehicle_color": "{{vehicle_color}}",
  "vehicle_license_plate": "{{vehicle_license_plate}}",
  "lpr_detection_status": "{{lpr_detection_status}}",
  "door_name": "{{door_name}}",
  "door_status": "{{door_status}}",
  "shelf": "{{shelf}}",
  "shelf_name": "{{shelf_name}}",
  "stockLevel": "{{stockLevel}}"
}
2. Add TetherX to Each Alert Rule
Repeat this for every rule that should report to TetherX.
- Select the bell icon, then open Configurations and select the rule
Select + under the rule's existing actions, then Then to open the action list. Type
HTTPand choose Use http requestSelect HTTP request and choose TetherX
Check the rule now reads Use TetherX, then select Save
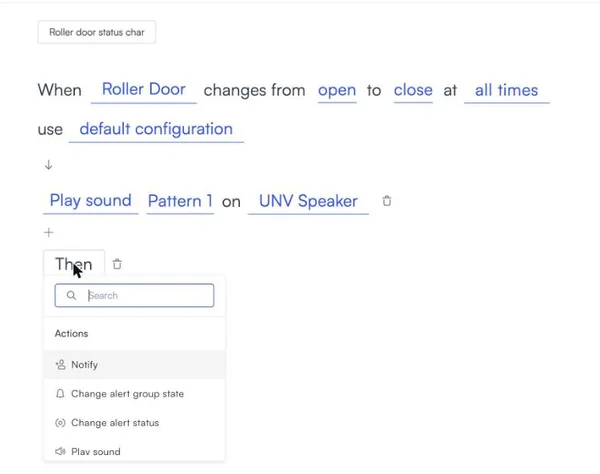
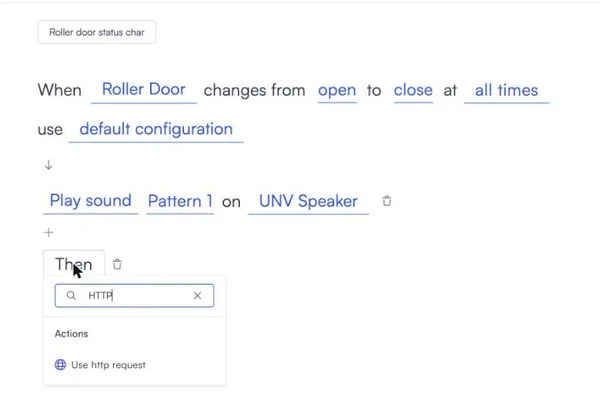
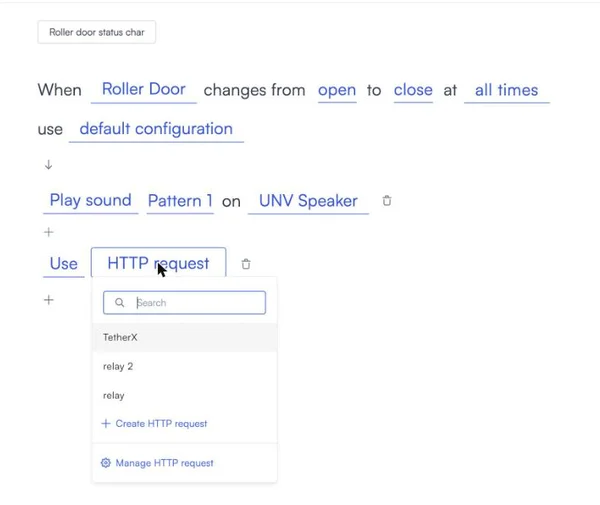
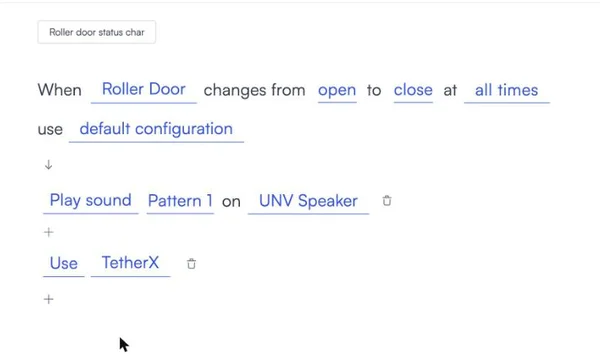
The TetherX action runs beside the rule's other actions, so existing notifications, sounds and outputs carry on as before.
3. Report Every Detection (Optional)
An alert rule reports only what that rule is looking for. To send TetherX the appearance details of every person, vehicle and animal Lumana detects, add one Appearing rule that covers the whole organisation:
- Select Add alert, then Tracking, then Use template on Appearing
- Name it
TetherX metadata - people and vehicles - Objects: tick people, vehicles and animals
- Zone: tick All cameras and select Select. The rule then reads appear on Organization followed by your organisation's name
- Select default configuration and:
- switch Display alert off, so these detections are not added to your Lumana alert page and video walls
- leave Blocking period at
0, so every detection is reported - select Done
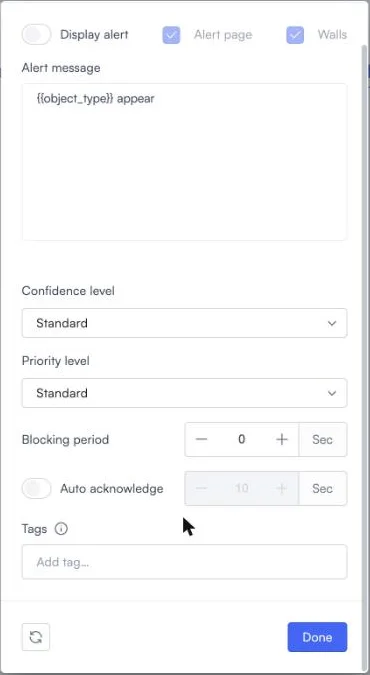
- Add the Use TetherX action as in part 2, then select Save
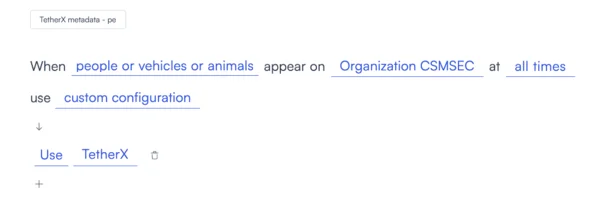
Busy cameras produce a detection every few seconds, so this rule sends far more requests than the others. Each one is a person, vehicle or animal detection on that camera in TetherX, so a camera set to notify you about people will notify you about the people this rule reports. TetherX sends at most one notification per event, as it does for a camera's own detections. This is the rule that lets you create the rules in TetherX, as described in Rules in Lumana or in TetherX.
Where Lumana Alerts Appear in TetherX
TetherX treats each Lumana alert as a detection by that camera, in the same way as the camera's own analytics:
- it opens a TetherX event, or adds to the one already open, within the camera's recording schedule
- it is listed in the events filter, and you can choose it in the camera's notification settings, under Lumana AI and the object Lumana saw, such as Person
- it notifies the people the camera's notification settings name, and reaches your monitoring centre if the site is monitored
- it can start a Detection rule on that camera, as described in Rules in Lumana or in TetherX
- a missing safety vest or hard hat from a protective gear rule is filed as Not Wearing Safety Vest or Not Wearing Hard Hat
- a vehicle is filed as Car, Truck, Bus or Motorcycle when Lumana names one type, and otherwise as Vehicle. Lumana usually sends a list of possible types rather than one, so most of its vehicles appear as Vehicle
Lumana's detections are drawn in green, beside the orange TetherX AI icons. Hover over one to see what Lumana saw, for example "male, 18 to 60 · Hair: black · Top: short sleeve, white · Bottom: trousers, blue · no hat, no bag". Only what Lumana recognised is shown.
Where the TetherBox keeps detailed trigger records, which TetherX support can switch on, each Lumana detection is also a green bar in its own lane under the event's scrub bar. Select a bar to play the video from that moment.
Notifications
Each person is notified by their own Delivery Method in their profile's notification settings: push, email, or both. See Notifications.
- A push notification names the detection and the camera, and tapping it opens the event's video at the moment of the detection.
- In the TetherX app it plays the sound chosen for other events, the same as a shared event, not the sound for health alerts. See Push Notifications.
Searching What Lumana Saw
What Lumana describes is also searchable under Appearance in the events filter, alongside TetherX AI's own detections: gender, age group, clothing colours, hair colour, sleeves, logo, pattern, trousers or shorts, hat, glasses, bag and carried items for a person, a recognised person's name, and make and number plate for a vehicle. Once your cameras have reported appearances, each control offers only the values they have reported, so Name appears only after Lumana has recognised somebody from its face list. Hover over the question mark beside a control's name to see what it matches.
Save a search like this and switch on Notify me to be told whenever a new detection fits it. The notification names the search, the camera, the site and what was seen, and matches within 15 seconds of each other arrive as one. See Events.
Matching Lumana Cameras to TetherX Cameras
TetherX support matches each Lumana camera to its TetherX camera once, by the camera's MAC address, or by its IP address where no TetherX camera has that MAC, and then compares the two cameras' pictures to confirm each match. Some cameras cannot be matched by address:
- a recorder, or a camera with several sensors, shows in Lumana as several cameras with one address, so support matches each of those by its picture
- a camera whose IP address in Lumana differs from the one TetherX holds for the camera with the same MAC address is left unmatched until support has checked which camera it is, as one of the two records is out of date
An alert from a camera that has not been matched yet, or that falls outside the camera's recording schedule, is kept but not shown on an event.
Troubleshooting
Lumana emailed to say the HTTP Request was disabled. Five deliveries in a row failed. Check the URL and the token with Test in the HTTP Request, and only switch it back on in Settings → Integrations → HTTP Request → Manage once the test succeeds. Alerts raised while it was off are not resent.
The HTTP Request switched itself off after I edited it. Saving a change with Update switches the request off. Switch it back on in the list under Settings → Integrations → HTTP Request → Manage.
TetherX receives @alert_name instead of the alert's name. The body was typed with @
in front of the variable names. Replace each "@name" with "{{name}}", or pick each
variable from the @ list so Lumana inserts it for you.
Lumana shows a delivery as Success but nothing arrived. Lumana's Alert notification logs record that a request was sent, not what TetherX answered. Ask TetherX support to check whether the request was received.
Related Articles
- Control Room Software Integration - How the platforms compare and what each gives you
- Immix Integration - Alarms and live video sent to an Immix control room
- HikCentral Integration - Generic events sent to HikCentral Professional
- Events - Appearance searches and Notify me
- Automations and Rules - Detection rules and the actions they run
- Push Notifications - Notification sounds in the TetherX app
Referenced in: