Table of Contents
- Opening Live View
- Choosing a Layout
- Narrowing What You See
- Saved Walls
- Filing Presets Under Headings
- Stepping Through a Heading
- Quality and Scaling
- Tile Controls
- Local Streaming
- PTZ Controls
- Talkdown
- Troubleshooting
- Keeping Key Cameras Visible
- Events, Notes and Maps
- Remote Control and Integrations
- Related Articles
Live View
Live View shows your cameras live, in a wall of tiles you arrange yourself. You can save a wall you use often, file your saved walls under headings, and set a heading stepping through the walls under it.
Opening Live View
Click Live in the left sidebar. If you hold more than one timeline, pick the one you want from the timeline dropdown at the top of the sidebar, or choose Timelines: All to see every camera you can reach.
Choosing a Layout
Select Layout in the sidebar holds every shape a wall comes in, in three tabs:
- Normal - Use these on a 16:9 monitor or a laptop screen.
- Wide - Use these on a 21:9 monitor, or on a phone held sideways.
- Tall - Use these on a phone or a tablet held upright.
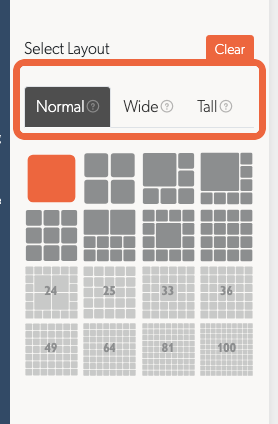
Each tab offers grids from a single tile up to 100, and several shapes give one or more tiles more room than the rest: a 6-tile wall with one large tile, a 13-tile wall with one large tile, a 9-tile wide wall with a large tile across the middle and a column each side. Click Clear beside the heading to empty every tile without changing the shape.
Click the camera name at the top of a tile to choose what it shows. The picker groups cameras by site and offers a Filter cameras box. Cameras that can pan and tilt are marked PTZ, and cameras that can carry your voice are marked TALK. On Timelines: All the picker asks which timeline first.
Drag the grip beside a camera name to move that camera to another tile. Both tiles swap.
Narrowing What You See
The Live tab in the sidebar holds two lists:
- Site - Show only the cameras at one site.
- TetherBox - Show only the cameras on one TetherBox.
Choosing a site also makes that site's timeline the timeline for the page, so the sidebar lists what that site holds. Choose All in either list to go back to everything you can reach.
Saved Walls
A preset holds a layout and the camera in every tile. Open the Presets tab in the sidebar to see the ones you have saved.
Presets sit in two halves:
- My presets - Yours, and nobody else sees them.
- Shared with everyone - Offered to everybody on the timeline. A preset saved on Timelines: All belongs to no timeline, so it cannot be shared.
Saving a Wall
- Choose a layout and put a camera in each tile.
- Click the plus button on the My presets line.
- Give it a name, and turn on Sharing if everybody on the timeline should see it.
Click a preset to put it on the wall. The wall changes in place, so nothing else on the page reloads. Press 1 to 9 to open the first nine presets in the list without reaching for the mouse.
Once you change the wall under an open preset, a disk button appears on its row. Click it to save what is on screen into that preset.
What Else a Preset Row Offers
Right-click a row, or click the ... button on it, for:
- Update and Go back to the saved version - Only on the open preset, once the wall differs from what it holds.
- Duplicate - Copy it, including a colleague's shared preset.
- Edit preset - Change the name, the description and who can see it.
- Set default - Open Live View on this wall from now on. The row wears a star.
- Share with everyone and Make private - Move it between the two halves.
- Delete - Remove it, after a confirmation.
Tip: A search box appears above the list once you have more than five presets, so name a wall for the site or the job it covers rather than numbering them.
Filing Presets Under Headings
Click the folder button on the My presets line to add a heading, then drag presets onto it. The count beside the heading name says how many are filed there.
- Drag a preset onto a heading to file it there, or into the other half to change who can see it.
- Drag a heading itself into the other half to offer the whole group to the timeline. What is filed under it goes with it.
- Click a heading to roll it shut. It stays as you left it the next time you open Live View.
- Right-click a heading, or click the ... button on it, to Rename it or Delete group.
Deleting a heading keeps the presets that were under it. They go back to the top of the list they are already in.
Stepping Through a Heading
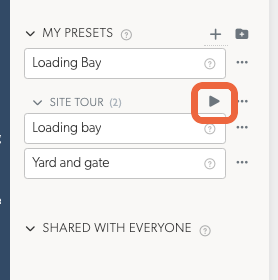
File the walls you want to watch under one heading, then click play on that heading. Live View opens the first wall and steps through the rest of them in the order they are listed, then starts again.
A heading offers the play button once it holds two presets, so drag a second wall under a heading to make it appear. The panel steps through one heading at a time: pressing play on a second heading takes the cycle from the first. Click the same button again to stop.
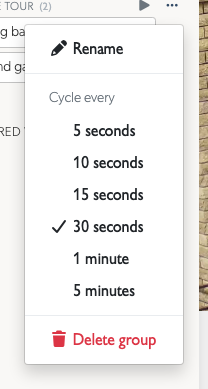
Choose how often the wall steps from the heading's own ... menu, under Cycle every: 5, 10, 15 or 30 seconds, 1 minute, or 5 minutes. The pace applies to whichever heading is running, and changing it while a heading is stepping takes effect at once.
Your browser remembers which heading was stepping and the pace you chose, so a heading you left running is still running when you open Live View tomorrow.
Quality and Scaling
Two switches sit under the camera lists in the sidebar:
- Quality - Auto selects a video stream automatically. Preview uses 1fps snapshots and the least bandwidth.
- Scaling - Fit shows the whole frame and pads the edges. Fill fills the tile and crops what does not fit.
For one camera rather than all of them, click the cog beside its name on the tile:
- Auto - Choose the video stream automatically.
- Primary (HQ) - The high quality stream.
- Secondary (LQ) - The lower quality stream.
- Preview - 1fps images.
Tip: If video stutters on every camera at once, switch Quality to Preview first. If it stutters on one camera, lower that camera's bitrate to match the site's upload speed.
Tile Controls
Hover over a tile for its own controls: fullscreen, a snapshot, zoom in, reset and zoom out, and a mute button. Tiles start muted in the wall and unmuted in fullscreen.
Each tile also shows a coloured dot beside the camera name for whether the camera is online, a colour-coded delay behind live in milliseconds or seconds, and a live timestamp. Delayed streams change colour; stale or stopped streams show a red timestamp, so a frozen or down feed is visible. The HD/SD button and Picture in Picture appear in fullscreen.
Local Streaming
When your device is on the same network as your TetherBox, Live View streams straight from the TetherBox rather than over the Internet, which lowers the delay behind live.
A coloured indicator in the top menu bar shows what you are connected to:
- Blue - Local streaming, on the same network as the TetherBox.
- Orange - A direct connection to the TetherBox over the Internet.
See Local Streaming for the full detail, the troubleshooting steps and what a corporate network needs.
PTZ Controls
For cameras that pan, tilt and zoom, open the PTZ panel under the tile.
- Directional arrows move the camera, and the centre button returns it home or starts its patrol.
- Zoom in and zoom out change how close the picture is.
- Control speed sets how quickly the camera answers each press.
- Presets lists the positions stored on the camera itself. Click one to send the camera there, or the refresh icon to read the list again.
- Relays operates the camera's outputs, for a light or a gate.
- Light and Wiper appear on the cameras that report them.
On a phone, turn the handset upright to reach the PTZ controls.
Talkdown
For cameras with a speaker, Talkdown (Push to Talk) carries your voice to the camera. The microphone button appears on the tiles that support it, and you can send a recorded message instead of speaking.
Troubleshooting
Video stutters or stops:
- Switch Quality to Preview.
- Use a layout with fewer tiles.
- Check the site's upload speed.
- Lower the camera's bitrate.
A tile shows an error:
- Check the camera is online on the Cameras page.
- Check the TetherBox is connected.
- Reload the page.
PTZ does nothing:
- Check the camera supports PTZ.
- Check nobody else is moving it.
- Some cameras need a moment between commands.
Live View pauses on its own:
- When an idle limit is enabled, Live View asks Are you still here? after a period without input and stops the streams until you answer. Administrators and integrators can change the duration. Choose No limit in the TetherBox's live-view idle setting to disable the limit for that source. On a wall with several remote sources, any remaining positive limit still applies; local streams are excluded from this calculation.
Keeping Key Cameras Visible
To keep an entrance visible while other cameras change, use the same layout in your cycling presets and keep the entrance camera in the same tile. Live View retains an active camera that the next preset leaves in place.
You can also arrange separate browser windows or split-view panes beside each other: for example, a fixed entrance view beside a cycling wall, or Live View beside an alarm-filtered Events page.
Events, Notes and Maps
Right-click a camera tile, or use its ... menu, and choose Show events to open that camera's events. The Events page supports saved filters, including alarm filters, and live previews. Keep it beside the wall when you want to review incidents while watching live cameras.
The site-notes button beside a camera name opens the site's instructions for users who have permission to read them. Map views and map links in event details provide the location context. A direct Show on map item in the Live View context menu is not currently offered.
Remote Control and Integrations
The video-wall API can list a user's saved perspectives and request a preset switch. Connected Live View clients for that user receive the switch through ActionCable. Remote browser refresh is also available through the authorised settings action.
An integration should use the viewing account intended for its wall. A preset-switch request is sent to that account's connected Live View clients; it does not select a unique browser pane by a physical screen identifier.
Related Articles
- Talkdown (Push to Talk) - Speaking through a camera.
- Related Zones - Opening the cameras beside the one that raised an event.
- Cameras - Managing camera settings.
- Local Streaming - Watching straight from your TetherBox.
- Notifications - Configuring alerts.
Referenced in:

